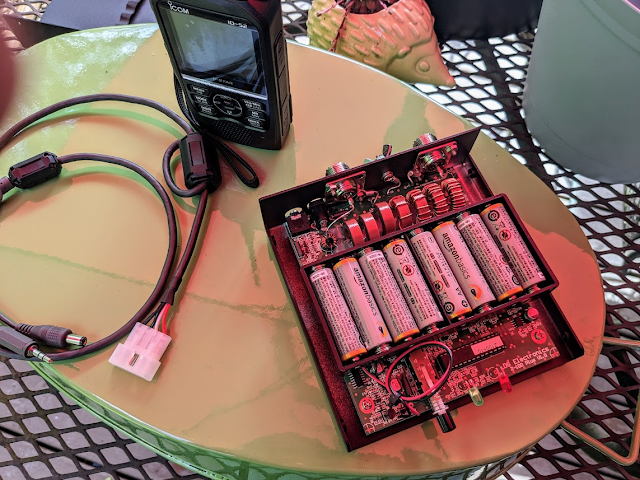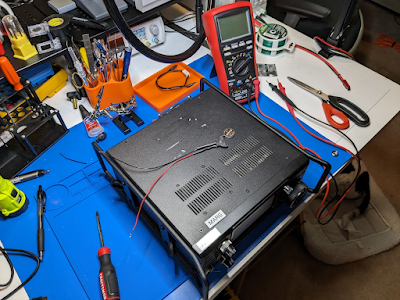
16 September 2023

The Bench

A few weeks back I posted some pictures on Facebook showing how I replaced the clock memory battery in my IC-7300.


Some readers contacted me and asked about the tools I used to do this job, so I figured it was time for an abbreviated tour of the workbench. Timely, because the memory battery has crapped out on my second IC-7300, so I'm setting up to get that one fixed.

To begin, my 'bench' is really a table that sits in the middle of a room full of junk. Literally, in the middle of a room full of junk. Junk to the left, junk to the right. Junk straight ahead and behind. There's even junk piled at my feet. Electronics gear, fishing gear, radios, camping gear, you name it. 

The bench started out years ago as a table that I did all my fly tying work on. Yes, I used to tie a LOT of flies for fly fishing, so many that I'm still using flies I tied up over 5 years ago! As my interest in electronics grew I started plopping more and more test and builder gear on the table until one day I decided I needed a dedicated electronics work bench. I packed up all my fly tying gear and put it in storage. I fully intend to get back to fly tying one day (it is a very relaxing and artistic way to spend a few hours), but for now it's all about pushing electrons around. 

Like most electronics hobbyists the collection of stuff grew slowly as my needs evolved. Nothing on this bench is 'lab grade'; most of it is good quality hobbyist gear that came out of China or the far east. Regardless, it all fits the bill nicely. So let's have a look:
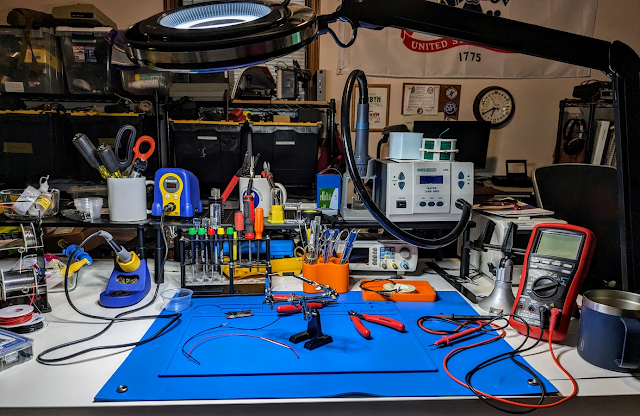
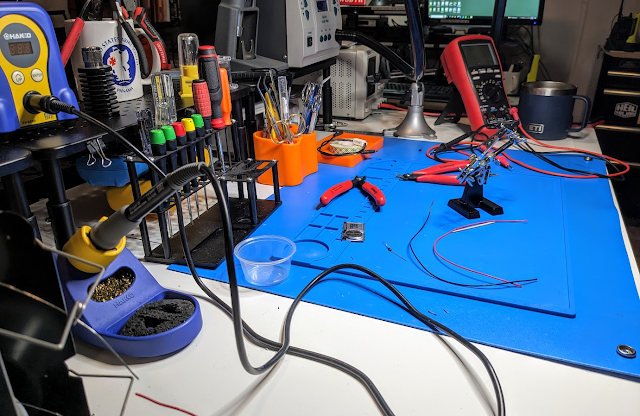

Let's start with lighting, since that is probably one of the biggest issue I face in this cave. I depend highly on the LED magnifier lamp on the swing arm you see in the picture. It's absolutely essential for focusing light on the work area and magnifying the project. It's the true unsung hero of the workbench. It wasn't cheap, but it was a solid investment. I use it every single day.

Next, the soldering station. It's a Hakko FX888 digital station, and it is the single tool on the bench that has allowed me to tackle so many projects. In the past I used various single wattage/single heat irons that were clumsy performers. This soldering station, with it's digitally controlled temperature settings and interchangeable tips has allowed me to tackle projects that I just couldn't in the past. Again not cheap (but not too expensive either), but well worth the money.

Multimeter. I've got a small collection of multimeters - a few Fluke's (to include an 87V), a few Brymens, some off-brands. The one that has become my standard bench meter is the Brymen 869s. I bought this meter on the recommendation of several reviewers, particularly David Jones, author of the EEVblog website and YouTube channel, and Joe Smith, who does destructive testing of multimeters. Both heaped high praise on this meter for its features and accuracy. While not as physically rugged as a Fluke, it carries a UL and German TuV certification, so it more than meets it's electrical overload protection ratings. Plus it offers far more features than the highly vaunted Fluke 87, at about half the price, and the display is far easier to read. Because Brymen does not sell its meters in the US (they have a marketing agreement with Greenlee) I had to order this one from a distributor in Poland, of all places. This is another tool that gets used almost every day.

Hiding away behind the Brymen multimeter is a Siglent bench power supply. While most of my power testing requires 12 - 14 volts, something easily supplied by one of my ham radio switching power supplies, I occasionally have to take things down to 9 or 5 volts. Hanging off to the side is a collection of test leads I can connect to the power supply, allowing me to hook up to just about anything. 

The Quick 8610 hot air rework station sitting on the shelf is a recent acquisition. I needed it to do some SMD component replacements on an amplifier project, and it works like a champ. I've used it on several other projects since, and I'll be using it on the upcoming IC-7300 battery replacement (Icom solders the OEM battery directly to the board, making it hard to get off with a conventional soldering iron). Honestly, it can be frightening how fast it works. While this is not a top-end unit, it gets very good reviews from folks who do board-level repairs on computers and other electronics. Louis Rossmann, who runs a business doing Apple board-level work and has a very active YouTube channel, actually prefers this rework station to the much more expensive Hakko systems he previously used.

The blue mats are a combination of an electrostatic grounding mat and a silicone soldering mat. When working on sensitive electronics I'll use a grounded wrist strap that snaps to the mat and connects to the house ground. Very cheap insurance.

In the middle of the blue mats sits one of those inexpensive hobbyist 'third hand' tools that I have to admit is all but indispensable. Yes, I've got much more expensive electronic component holders, including a rotating circuit board work holder that can support a full-sized computer board, but this cheap little tool gets used the most for simple tasks like soldering two pieces of wire together. You'll also see a small PanaVise head sitting off to the right. That gets used a good bit, too. 

Hand tools. I've got a large assortment of hand tools - screw drivers, cutters, wire strippers, pliers, scissors, tweezers, small rulers, X-acto knifes and more. Honestly, I don't know where a lot of this stuff came from. Some I used in my fly tying activities, some I just had laying around when I started this hobby. The two hand tools that get use most on the bench are sitting right up front - the red handled side cutter and the miniature pliers. I go through a set of these about once a year, particularly the side cutters. When they get dull don't even think about trying to sharpen them. Just toss 'em and get another set.

Magnifiers. I have to admit it, my eyes are not what they used to be. When I joined the Army in 1979 I had 15/15 vision. Today I can't even get out of bed without glasses. I'm almost 67 and have a bit of cataract forming in both eyes. I need both good light and magnification. I've got a number of small hand-held magnifiers that live on my bench, plus I've got an OptiVisor headband magnifier with an LED light attachment, something I find I'm using more and more. 

I do have an oscilloscope - a Siglent digital model, but I've had little use for it over the past year so it's sitting in storage on a shelf in the far back. 

Last, but certainly not least, are all the consumable supplies sitting on or near the bench - 
  • denatured alcohol for cleaning just about everything electronic
  • Q-tips
  • spools of solder, paste flux and liquid flux, along with solder wick and a surprisingly effective spring loaded 'solder sucker'
  • electrical tape
  • double sided tape
  • heat resistant tape (really needed when doing hot air re-work stuff)
  • small zip ties
  • a box of toothpicks
  • a tube of silicone glue
  • a bottle of superglue
  • paper towels
  • glass cleaner
  • a roll of twist-tie material
  • Sharpie markers
  • small parts containers - little plastic salsa 'bowls' that I steal from local Mexican restaurant chain whenever we go there for lunch or dinner
  • pens & pencils, and a notebook
  • Yeti coffee cup full of my favorite coffee 😄
And wire. Lots and lots of wire. When working on the bench most of my wire needs fall into the 18 - 22 gauge arena. Lately I've been going through a good bit of 22 gauge Teflon coated wire. I keep two spools of red and black on-hand. 

I think that's about it. If you have any questions about anything you see just drop a comment below.

W8BYH out

26 August 2023

The Most Important Amplifier In Ham Radio

The title is a pretentious joke, but there is a kernel of truth in there.

A few days ago I wrapped up my HobbyPCB HardRock50 amplifier build, and I'm in the process of testing it with a variety of QRP rigs. So far so good with the Yaesu FT-818 and the Icom IC-705, and testing with the Elecraft KX2 is coming up. Right now I'm updating the external interface for the IC-705 that is manufactured by HobbyPCB, an interface that allows the amplifier to follow band changes on the radio and trigger tuning cycles

Earlier today I created a video showing the start-up procedure when using the amp and the IC-705 interface with the IC-705. The video shows how the IC-705 interface controls band switching (via Bluetooth), tuning and amp triggering. The interface works quite well, but it is an extra cost item ($70 as I have it configured) from HobbyPCB. Note - you DO NOT need this interface to run the IC-705 with the amplifier - the interface just takes care of the band switching and tuning duties, something you can do without the interface. You just have to do those tasks manually, and it's not at all difficult. 


I'm quite happy with the output. Signal reports from fellow hams are good, and I'm easily getting 50 watts PEP on sideband when driving the amp with 3 watts of output from the radio.

Building this amp was, as it's popular to say today, 'a journey', and I've outlined much of it in earlier postings. This is the second of these amp kits that I've built, and I learned a LOT on the first build. The reason I built this new amp is because the previous amp kit was an early model (shipped in 2014 but never built) and it had some issues regarding the ability to interface with the IC-705. I figured I'd start with a clean slate (and somewhat improved soldering skills) with a current production kit from HobbyPCB that included the internal tuner board. While this is not a tough kit to put together, it took me several months to get it done as work, family commitments and other factors got in the way. 

One of the hiccups was a blown capacitor on the amp board, which the manufacturer put down to it being a tantalum cap with known tendencies to let out the smoke when voltage is first applied. Jim Veatch, the owner of HobbyPCB, said they are likely going to switch capacitor types on the next production run. He cheerfully sent me two replacement caps. The job to replace them gave me the convenient excuse to buy a hot air re-work station to get the remains of the old cap off the board, get things cleaned up and the new cap in place. 

Poof!
Luckily the damage was limited to the blown capacitor

Getting set to replace the blown capacitor

Another issue was the maddening discovery that the mounting holes for the tuner board had been mis-drilled in the case - basically they were drilled 'backwards', but you don't immediately know that until you go to mount the tuner board in the case and button everything up for testing - it just doesn't fit, and too much forcing can result in some bent connector pins (don't ask me how I know...). Again, Jim at HobbyPCB got back with me and let me know that their recent production runs had the holes on some of the cases drilled improperly, and he's only finding them when people like me bring up the issue. He offered to replace the case but I had to ship the old one to him first, or he could send me a template that would allow me to drill my own holes in the proper location. I opted to go the template route.


So, I can't emphasize too much that this is a 'hobby' build - the instructions are very good, and on-line support is good (Jim answers emails promptly and very courteously), but you are still likely to run into glitches like I did. This is where the hobby aspect comes into play, and you're kind of expected to do your own troubleshooting. Adversity builds character, right? But HobbyPCB also states that the price of the kit includes a working amplifier, so if you get it all together and simply can't get it working you can ship it off to Jim and he'll diagnose and fix whatever's wrong, for free.

The IC-705 interface module - a box that connects between the amp and the 705 and allows
automatic band switching and tuner operation. It's basically an Arduino board with a Bluetooth
interface. I just got through soldering in the add-on board that drives the tuner in the HardRock50
(the lighter colored board in the upper right)

Another challenge for those of you not used to running bootloaders is updating the firmware. Your kit will likely ship with a slightly outdated firmware version. Updating the firmware isn't tough, but you have to install a bootloader on your computer and run the update from there. It's a well documented procedure, but might put off those with limited computer skills.

Last, although everything about this amp and the add-on components like the tuner and control interface are well documented, the HobbyPCB website is something of a dog's dinner in terms of organization, and HobbyPCB has some dead links and pointers to outdated files out there. They need the help of a good web developer.

So what's the use case for this amp? For me it's simply this - with the demise of portable all-band, all-mode 100 watt rigs like the IC-7100 or the FT-857, I am looking for more 'oomph' for both my IC-705 and my KX2. I love those rigs, but feel that they are limited by their 10 watt output, particularly when working voice. Let's focus on the IC-705 - an incredibly capable radio that brings together all the features anyone would need for portable operations. I consider 50 watts as something of a sweet spot for portable work. In most cases going from 50 - 100w output doesn't really get you much beyond greater power consumption. I also like the idea of the two components in separate packages. If I only want to run digital I can go out with just the radio and work at 10 watts. If I want to run voice, I can bring along the amp and push things up to 50 watts. With the internal tuner in the amp I can also leave the Icom tuner behind. It's all about options and capability.

OK, what about this silly 'most important amp in ham radio' claim? Well, here's the truth of it. To be an effective portable shack-in-a-box radio the IC-705 needs to put out more than 10 watts. This is particularly important if you want to use the rig for EMCOMM applications. Ten watts may be enough for digital modes, but for SSB it's not enough for reliable & repeatable comms. There are a number of solid state amps on the market that will work with the IC-705, but they generally fall into two categories - low cost, low output Chinese manufactured amps of poor quality, and high quality (and expensive) 100+ watt amps designed for in-shack use from companies like Elecraft, RM, ACOM and others. The HardRock50 is the only high quality, field portable, well supported and reasonably priced amp available for QRP rigs. This means the HardRock50 stands alone as an amplifier that can turn the IC-705 into a serious field radio for EMCOMM use. So while not the most important amp in all of ham radio, it is still the best option to turn your field QRP rig into an effective tool for reliable communications.

The next step is testing using a battery instead of a power supply - I'll test using a 12 amp hour LiFePo battery to see how long that holds up in field use. I'll also be testing with the KX2. So stay tuned!

W8BYH out

05 August 2023

Considering the IC-705?

Earlier today I watched a YouTube video by Ham Radio DX doing a 'should I buy' review of the IC-705. While the video is otherwise unremarkable, the author did mention a few things that clicked with me, and started me thinking.

I've owned my IC-705 for over two years, and really like it. Notice I say 'really like', not 'love'. There have always been a few things about the 705 - issues and shortcomings - that bother me. I've written about most of these issues on this blog, so I won't go back and beat the dead horse (just search on the blog for 'ic 705'). I'll just say that while the IC-705 stands alone in its class it still has some shortcomings.

Which leads us to this post, and the ideas spurred by the Ham Radio DX video. Here's my advice to folks considering buying an IC-705, or have bought an IC-705 and are struggling with some of its shortcomings:

The IC-705 should be considered as nothing more than the core of a larger radio system. It is minimally functional right out of the box, but requires a compliment of additional hardware and software to be considered a fully mature and capable system.

To be fair, this concept applies to virtually every other QRP rig I've owned or used, including the highly touted Elecraft KX series. However, Icom seems to specifically market the IC-705 as a complete, all-in-one rig that really doesn't need any add-ons. But out here in the real world, it does.

So, if you think about the IC-705 as being just the core of a larger 'system' you will be less likely to focus on its shortcomings and become disappointed. The other components of the system will effectively address the shortcomings and make it an incredibly capable best-in-class radio system, but at a cost.

What are these system components? Here's my minimum requirements list:

  • Environmental protection for the radio. Something like the Peovi or Windcamp cages or one of the dozens of 3D printed cages on offer on eBay. I particularly like the Peovi solution because of the available polycarbonate snap-on cover made by SideKX. ($285 current price for the Peovi)
  • Antenna tuner. Please, spare me the righteous talk about only using resonant antennas. This is the real world, and I like frequency agility. Compromised antennas are often a fact of life, particularly with lightweight portable radio setups. While just about any tuner will work with the 705, the one that works best in my experience is Icom's own AH-705. It's an incredible tuner, although somewhat big when compared to the radio itself. ($360 current street price)
  • Power. To get the full 10 watts out of the IC-705 you'll need an external power source. The good news is that it doesn't need much external power. Like a lot of 705 owners, I use a small 4.5 amp hour lithium-iron phosphate battery that will keep the 705 running at 10 watts for well over 8 hours. ($65 from Bioenno)
  • Software (and the computer to run it on). Software is only required if you run digital modes, but since most folks buy the 705 for its digital mode capabilities, some software is required. The only software package I consider absolutely essential is Icom's own RS-BA1 v.2 software. It is the remote server component of this package that allows you to control the radio via a wi-fi USB connection. Why not just use the USB port on the radio? Because Icom failed to properly shield the IC-705 and the radio is highly susceptible to RFI coming in over the USB connection. It is so bad that, when running digital modes like FT8, it overwhelms the radio on all bands. I wrote about this in an earlier post so I won't re-hash it here. Suffice to say, you'll need the RS-BA1 software. ($140 current street price)
These minimum system add-ons come to $850, in addition to the base cost of the IC-705. There are cheaper options on the market for things like the protective cage, tuner and battery, so consider this $850 a high-end estimate. It just reinforces that reality that most IC-705 owners will face at some time or another. You don't have to buy these at the same time you buy your radio, but to exploit the full capability of the 705, at some point you'll likely need to add them.

If you go into the IC-705 purchase knowing it takes these add-on items to reach what we called in the Army 'full mission capability' you are much less likely to be disappointed with your radio.

W8BYH out

14 July 2023

Biting The Apple

I live in a house divided. I'm a Windows guy. KQ4IZK is an Apple gal. I take care of all the overhead - I make sure all the shared software license fees are paid, I keep the network up and available, make sure the streaming devices are working, pay all the IT-related bills and generally keep the home computing environment running. I also keep all the Windows and Android devices running. KQ4IZK lives and breaths Apple. She'd got her MacBook(s), iPad(s), iPhone(s) and there's even an Apple Watch laying around somewhere. And she's pretty darned good with all the Apple stuff. I get almost zero tech support calls (ha, ha) from her on things MacOS or iOS. She loves her Apple ecosystem, and it works well for her. 

There was a time when I was enchanted by Apple products. I've used Apple II+'s and early Mac's, and thought they were great, and I lusted after the early iPhones. I think a large part of my attraction was related directly to Steve Jobs. Jobs was a force of nature who could sell ice to an Eskimo and spin a vision like nobody else. And let's be honest, the iPhone and iPad really were foundational concepts that changed how we communicate and consume content. In my work I've had to support several generations of iPhones and iPads. I appreciate the app-focused ease of use found on these devices; they are far more dummy proof than Windows or Android devices. But I've always found iOS-based devices to be 'too much for too little'; the cost of the devices was much too high for the level of usability they provided. They were (and still are) viewed as prestige devices; you pay a premium for the name and the logo. I have far less experience with MacOS, but found it odd that when Apple switched from Motorola to Intel CPUs, all the Mac fans rejoiced because now they could finally run Windows natively on their Mac hardware. Hmmm...

I've always been impressed by the build quality of Apple's hardware. Across the board their products seem better built, with more attention to detail on the fit and finish. But over time some cracks developed in my Apple windshield. At work, where we use a LOT of iPads going back at least four device generations, we started to notice a lot of premature device failures. Some of them were clearly hardware related (cracked screens, non-responsive buttons, etc.). Some 'just died'; they worked yesterday but not today. Some would go off to IT for an OS upgrade, and would never come back. The response from the service desk was often, "we tried to upgrade it and it bricked itself". Were these failing at a higher rate than the cheaper Android tablets we bought, like the Samsung Tabs? Probably not, but we were paying around $250 for perfectly adequate Tab 8's, and over $500 for the 2020 iPads. And some really annoying Apple product positioning issues started to crop up. We needed iPads with GPS in them for outdoor data collection, but the basic level iPads don't come with GPS. If you want GPS you have to shell out an additional $100 per unit for the data plan ready model (the ones that can take a phone plan SIM card). Yet the much cheaper Tab 8's all came with GPS. More Hmmm....

Over time I became less and less enamored with Apple's hardware. The outward fit and finish was (and still is) very good, but the physical build just seemed lacking. They may be fine for schlepping around the Stanford University campus, but for field data collection at the world's busiest airport they were just not holding up as expected - particularly considering the price. In fact, I started to compare the service life of some of the MacBooks we use at work against a generic issue Windows laptop like a Dell Inspiron. The Dell was a lot cheaper, lasted just as long, and served the average user just as well as the Mac. The build quality of an Inspiron isn't as good as a MacBook, but if I crack the screen of an Inspiron I'm not going to cry like I would if I cracked the screen of a MacBook. I began to doubt the Mac hardware was really as good as Apple and Apple fanboys claim it is, but I didn't have any hard evidence beyond my very unscientific gut feeling.

But earlier this week I stumbled on this guy's YouTube channel, and found his Mac repair videos and commentary both revealing, and a bit humorous. Louis consolidates all that he finds wrong with Apple products into one 24 minute video.


The video is five years old, but I doubt Apple has improved things. In fact, Louis has plenty of recent videos laying out similar issues with current production Apple products.

To be fair, you'll find similar design and execution issues in any other manufacturer's range of laptops, including the highly regarded Lenovo ThinkPads. The big difference with Apple is that they've become expert at deflecting the blame for lousy hardware design and early product death back at the customer. They actually make the customer feel remorse for bringing the issues up. How else can you explain why customers who've been screwed over by Apple keep coming back time and again just because it's Apple, and everyone knows Apple is that edgy, forward thinking visionary company that keeps pushing the envelope? When in fact all they deliver is nicely packaged run-of-the-mill hardware that has lots of engineered-in planned obsolescence.

If you think I'm just another Apple hater, I invite you to read some of my pervious posts about Windows hardware, particularly the Microsoft Surface line.

 W8BYH out

08 July 2023

Pop Goes The Weasel

For the past two months I've been slowly working my way through the HardRock50 amplifier kit designed and manufactured by Jim Veatch at HobbyPCB. This is the second of these kits I've put together. The first one I bought off of QRZ.com last year. It was used, but new-in-the-box. The owner bought it from a friend, who had bought it from HobbyPCB. Neither of the two had the time to put the kit together so the last owner sold it to me at a significant discount. Everything was still in its factory fresh packaging. However, it was only after I got this kit that I realized it was an early 2014 vintage unit. HobbyPCB still supports them, but getting the amp to work with modern QRP rigs like the the IC-705 was going to be difficult. Lots of jumpering, some cutting of traces, etc. This unit works well with my Yaesu FT-817, but I still wanted something I could use with the IC-705. So, I bought a new kit from HobbyPCB and figured I could sell the old amp to help cover the cost of this new one.

HardRock50 paired with the Elecraft KX3

Construction of the HardRock50 is pretty straightforward, and Jim has tweaked the build instructions over the years to the point that everything is clearly described and diagrammed. Having already built one of these kits, this second build went quick and relatively easy. One of the upgrades Jim has introduced over the years is that a lot more of the components are now pre-installed at the factory. With the 2014 kit you got a bag of relays and instructions on how to stuff them on the board. With the current kit, the relays are already on the board. This cuts down on a lot of the tedious soldering. If you've soldered one relay, you've soldered them all.


Everything went pretty straight forward until I got to the step where you have to set the DC bias. There's a Rube Goldberg-esque setup in the manual that has you interconnect your power supply with your ammeter and the amplifier. I've done this a few times with my old amp, with no problems. Just take your time and follow the test lead and power connection instructions in the diagram.


OK, all cables connected and checked and re-checked. I reach over and hit the ON switch on my power supply and POP! Lots and lots of smoke coming out from under the board. Damn, damn, damn, damn, damn. I pull everything apart to get a look at the underside of the board and find that capacitor C36 - a pre-installed component, had popped. What the hell had I done wrong? I checked and re-checked my test lead setup, and everything looked good. But SOMETHING went wrong. The evidence was inescapable. Clearly I screwed up.


I contacted Jim and asked him if he had any ideas as to what could have caused this - something upstream in the build I had put in wrong? Maybe a solder bridge I didn't catch? Jim wrote back almost matter-of-factly,

"Tantalum caps have a habit of blowing the first time voltage is applied"

Oh really?! I'd heard 'tant caps' could be problematic. As the comedian Bill Engvall says, "Here's your sign".

So Jim is mailing me a new cap, and I'll report back on how well this one survives. At least this experience gives me the excuse I've been looking for to buy a hot air solder rework station.

W8BYH out

30 April 2023

Building The Bomb


No, not that bomb. I've set out to build what I consider the ideal field computer for Amateur Radio use. I guess in this case I shouldn't use the term 'the bomb', but instead, 'da. bomb', as in 'this computer is gonna' be da' bomb!' When the grid goes down, this bomb needs to keep on ticking.

This little project is an extension of my experience with tablet computers (discussed here), and my frustration with any ham radio manufacturer's inability or unwillingness to deliver a ruggedized full featured field radio that doesn't cost more than my camper (which, if you're curious, set me back $22,000). Any rugged field computer would need to be accompanied by an equally rugged computer to run digital modes, CAT control software, etc. While Icom or Yaesu still can't get the radio side done, at least Dell can get the computer side done.

I've come to really like the Dell Latitude line of ruggedized computers, particularly their tablets - the 7212 and 7220 line. The 7212 went out of production last year, and the 7220 is about to be replaced in Dell's lineup with the 7230, but good used examples of both tablets - the 7212 and 7220 - are available on eBay and from on-line resellers like Bob Johnson's Computer Stuff out of Delaware. (Side note - I've bought from Bob Johnson's in the past and can highly recommend them.)

Dell Latitude 7220 in all its naked glory

I was fortunate enough to have evaluated the 7212 at work, and of all the tablets I tested I found it to be the best in overall performance and design. There's nothing unique or spectacular about the guts of these Dell tablets - they are run-of-the-mill i3, i5 or i7 processor units with on-board graphics, 8 or 16 gigabytes or RAM and up to 1 TB of storage. There are dozens of tablet manufacturers that can deliver the exact same specs and performance. The big difference with the Dell units is how those specs are delivered - the design and manufacturing of the overall tablet. This is where Dell excels. From the port covers to the battery design to the folding stand and how the removable keyboard integrates, Dell just does it better. The best example is the detachable folding stand. For most rugged tablet manufacturers, a folding stand (if they even offer one) is a kludgy after-thought. Yet everyone I know who uses a tablet wants one. Dell thought about this from the start, and designed the rear of the tablet around the folding stand. It's an extremely simple yet very well executed design. 

And of course, the 7212 & 7220 are IP65 and MIL-STD 810G rated, so they can withstand some rough handling and wet weather. Take the hint, Icom & Yaesu...

A bit of sniping on eBay got me a like new condition 7220 at a great price. That was just the tablet, and I needed a detachable keyboard, folding stand (as discussed above) and a carrying handle, all Dell accessories. Once again, eBay helped a here. A few non-Dell accessories like a screen protector, USB port extender and microSD card for additional storage came from Amazon. 


The next step was to test it in the real world. That started with loading common productivity apps like Microsoft Office and LibreOffice, followed by ham radio apps. The list of ham radio apps I wanted to have available on the 7220 was extensive:
  • Fldigi
  • Ham Radio Deluxe
  • Winlink
  • Vara
  • JS8Call
  • VarAC
  • Log4OM
  • Ion2G ALE
  • RTSystems programming apps for the IC-7300, IC-705 and the ID-52 and the Yaesu FT-3DR
  • Black Cat WEFAX and SSTV apps
  • VSPE - virtual serial port emulator
  • NetLogger
  • uBlox GPS management software
  • SCSChat 
  • SDRSharp
  • VOACAP
Little of this software gets used regularly. Most of it is loaded (and regularly updated) for just-in-case situations. In the field it's mostly Winlink, VarAC, Vara, Fldigi and occasionally Log4OM. While I pay an annual subscription for Microsoft Office (the family plan), my experience is that LibreOffice does better in the fully disconnected mode. Even without internet, Microsoft Office keeps trying to 'phone home' and sync with OneDrive. It can be a PITA, and consume computer resources you might need for something else. LibreOffice is mature, stable, compatible with Microsoft Office file formats, free, and has no internet dependencies. 


This grid down setup still needs some hardware add-ons. The Dell detachable water resistant keyboard is one of the best of its genre for typing, but the trackpad leaves something to be desired. A good Bluetooth mouse is in order. The attached stylus that Dell provides (it stores in the carrying handle) is quite good, but it's a bit cramped for regular use. A larger stylus helps for pointing duties when you are not using the mouse. Like most tablets, the 7220 is 'port challenged', so you'll need a USB-C based port extender. For headphones I toss in a set of C.Crane's excellent earbuds. I also bring along my ZumSpot USB DSTAR dongle, a USB isolation dongle, a u-Blox GPS/GLONASS dongle and a small handful of  USB thumb drives for data exchange with other operators. And don't forget spare batteries for your mouse, pen and any other battery powered devices. And then you've got to schlepp all this stuff around. A good quality, rugged computer bag is an absolute necessity. 

So how does it all work in the field? Pretty darned good. Battery life is excellent. I routinely get five hours of continuous use with two batteries installed. This is with screen brightness turned up for use in full sunlight, and using the detachable keyboard (which draws power from the tablet). Replacement batteries can be hot swapped, so I can snap in a spare fully charged unit and keep running almost indefinitely. Another great feature of the 7220 is that can charge via the USB-C port. This goes a long way in helping to move as much of my field gear as possible to USB-C connectivity and charging. One high capacity 3 amp USB-C charger can keep a lot of gear running in the field - my phones, iPads, Android tablet, this Dell tablet, my Surface Pro and Go, and more. Sadly, the only equipment manufacturers that haven't caught on yet are the ham radio manufacturers. They are still stuck on micro and mini(!) USB ports. C'mon guys, get with the program. But I digress.

I've used this tablet as a daily driver computer for a few months now. Not just for ham radio use, but as a home and work computer. It's a great all-around unit and really shines when out in the field. With all the ports buttoned up I don't have to worry about dust, pollen, heavy humidity or a light rain shower, and when the sun comes out I can bump up the screen brightness and not have to worry about finding shade. If I bang it into something (which I have) I'm not worrying about screen damage. It's a high performance, worry free device. Is it as good as a dedicated business laptop? No. I'm not going to try to fool anyone - there are plenty of cheaper computers that make better home and office units. My Surface Pro 7 is a better all-around business machine. Except when I drop it. Or leave it out in the rain. Or the battery dies. Or the sun comes overhead. That's when the Dell 7220 chuckles and says "hold my beer".

W8BYH out.

16 April 2023

Behold The Lowly Tuner

Antenna tuners* get little love. Every ham needs one, most have at least one, but they rarely get talked about in glowing terms, like a good radio, or great antenna design, or a fine cigar. Instead they are viewed mostly as lumps - lumps of metal or plastic that sit nearby and make sure the finals on your precious $2,000 radio don't burn up because you keep trying to put a 100 watt full duty cycle signal into an antenna that's a 10:1 mis-match.

The tuners built into most radios designed for Amateur Radio use are pretty anemic - handling (at best) a 4:1 mis-match. About all they'll do is lightly tweak a nearly resonant antenna. There are exceptions, like the internal tuners Elecraft builds for it's KX line of QRP radios. These remarkable units can tune the bumper on my wife's Hyundai. And I have to admit, Chinese manufacturers like Xeigu have put very good tuners in their radios almost from the beginning. This begs the question - if the Americans and Chinese are building really good internal tuners for their radios, why can't the Japanese? Has advanced tuner technology not made it across to that part of the Pacific rim yet? Geeze.

There is a single tuner that keeps popping up whenever I need to run a portable HF radio at 100 watts with a sub-optimal antenna. I've had it for several years, and bought it when I owned a Yaesu FT-891. I wanted something that could run off of batteries and handle just about any antenna I hooked up to it. This tuner worked great with the FT-891, and when I needed a tuner for an FT-991A it worked great for that, too. Then I got my hands on an Icom IC-7200, followed by an IC-7100, and guess what? It worked great with those radios. When I got my IC-705 and didn't want to pay Icom's outlandish price for the AH-705, I saw Ham Radio Outlet (HRO) was offering my tuner in a 'special IC-705 configuration'. I emailed the manufacturer and asked what made the tuner 'special'? In about an hour I got an answer back - all HRO was doing was bundling the tuner with a 3.5mm audio jack cable, to serve as the control connection between the radio and tuner. Like most hams, I had a several 3.5mm audio jack cables laying around. I hooked the tuner to the 705 and, sure enough, it worked! Seems the tuner was '705 ready' before the 705 was even a glimmer in Icom's eye. 

Most recently, I've begun testing the Icom IC-7300 for use as a field radio and needed a tuner that could handle antenna mis-matches greater than 4:1 (about the limit of the 7300's internal tuner). Once again, I grabbed this tuner and it worked great.


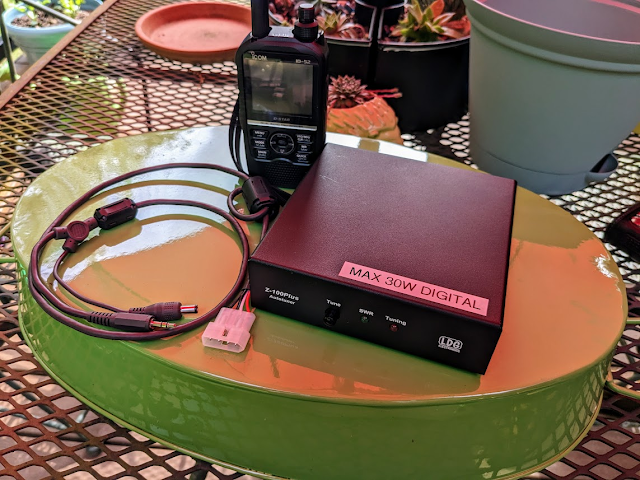
Recognize the tuner? It's the LDG Z-100 Plus. It's an unlovely lump - just a black metal box with some LEDs and a tune button. But what it lacks in aesthetics it makes up for in performance and versatility. It's relatively compact, runs on internal power (via a AA battery tray mounted inside), is rugged, reliable, fairly priced, and has tuned just about everything I've hooked up to it. 

The Z-100 Plus with an ID-52 for size comparison. Sorry for the goofy color balance - I
shot the tuner on a green tray, underneath a red umbrella. The sensor in my camera
must have gone nuts trying to get it all balanced out

LDG offers Icom and Yaesu specific cables for this tuner so they'll interface with your rig - hit the tune button on your radio and the Z-100 Plus wakes up and runs a tune cycle. The tuner will also work with just about any other radio by putting out a low power CW carrier and tapping the Tune button on the tuner. If there's any weakness in the system it's in the Icom control cable (which works with any tuner in the LDG line). I've gone through three due to broken or poorly crimped pins on the Molex connector that mates with the radio. Thank goodness the cables are reasonably priced. My advice is, if you are going to use this with an Icom rig, have a spare cable (or two) on hand.

Operating off grid? No problem. Just stuff a handful of AA batteries into the internal tray

If you are looking for a compact, internally powered 100 watt tuner with a proven track record that will interface neatly with Icom and Yaesu radios, check out the Z-100 Plus. LDG as a company has been around for a long time and they make quality products. This tuner may not be much to look at, but it performs great and is as reliable as a hammer. Almost as heavy as one, too.

*Ok, ok, ok, antenna tuners don't tune antennas. They just make the antenna look like a 50 ohm match to the transceiver. But 'tuner' is the commonly used descriptor for what we're talking about here, so we'll use it.

W8BYH out